
Accessories are a great way to turn an outfit into a complete look. A common accessory seen in mid to late 16th century Italian artwork is the saccocia. This style of pouch was also seen in Spain where it was known as a faltriquera. Below is a tutorial for making a saccocia. It’s a relatively easy accessory to create and can be as simple or elaborate as the wearer desires. I’ve found the saccocia to be both a convenient way to carry my personal items at events as well as an extra authentic touch.
Making a 16th Century Florentine Saccocia
Lelia Corsini
- Background and Examples
Saccocia, Italian sewn pouches, are the answer to how you carry things when you don’t have pockets or pants. They begin to appear in the records (descriptions and portraiture) in Florence and the other city-states in the mid-1500s. A saccocia was typically constructed of brocade, wool, silk, or linen and lined with linen or other cloth, that was then attached to a band. It was commonly worn between the chemise, or underskirt, and the sottana (dress). The saccocia was threaded through a slit in the skirt of the sottana. There are also examples of the saccocia being worn on the outside of the skirt.[1]
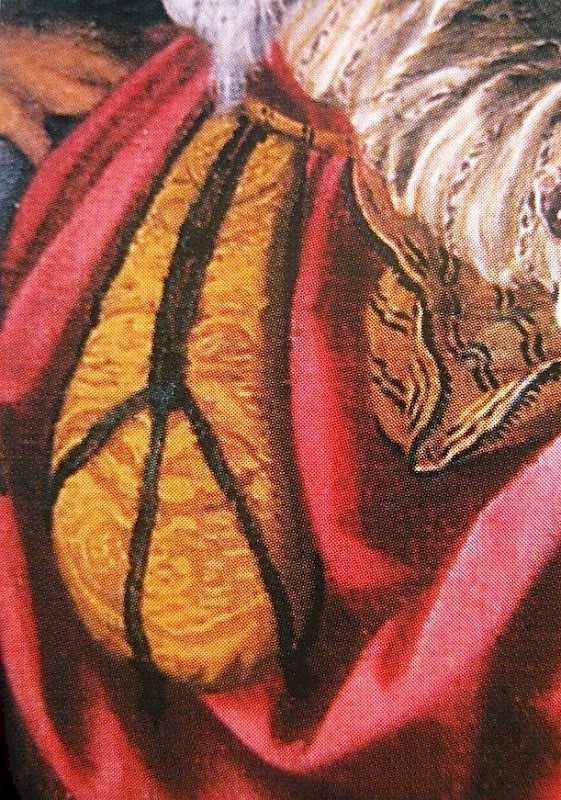

A slash down the front of the saccocia allowed for ease of access. The pocket typically ended at the hip so that it wasn’t uncomfortable to wear while sitting. It was often embellished with such decorative elements as couched cords, tassels, embroidery or beadwork.
- Construction
One of the benefits of the saccocia is that it is relatively easy to construct. It is made out of three parts:
- A lined front panel with a slit from the top down to the middle of the panel;
- A lined back panel; and
- A waistband.
The saccocia that appear in paintings were often decorated but that doesn’t mean they have to be. Both relatively plain and elaborately decorated saccocia are seen in paintings and extant examples. They should be lined because that provides stability and durability; an important thing when the pouch is carrying one’s belongings.

The pattern that was used in the example pieces was adapted from the pattern above[2]. The adaptation was because the dimensions provided in the original pattern ended up being too long for the wearer who is 5’4. As the pattern shows it is relatively simple to create and easy to customize to whatever size one prefers.
- Steps
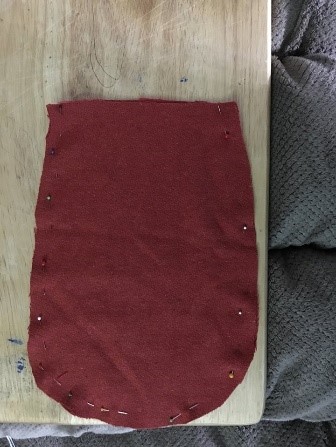
-Take a half yard of both the outer fabric and the lining fabric and use your pattern piece to cut out two of each. Then you need to designate one outer and one lining piece to be your front pieces; the other two will be your back pieces.
-Mark the slit to be cut in the front two pieces. Make sure that the slit is long enough to be able to slide your hand into in order to access the items inside, while keeping the pouch portion large enough to be able to safely fit whatever is going to be put into it.
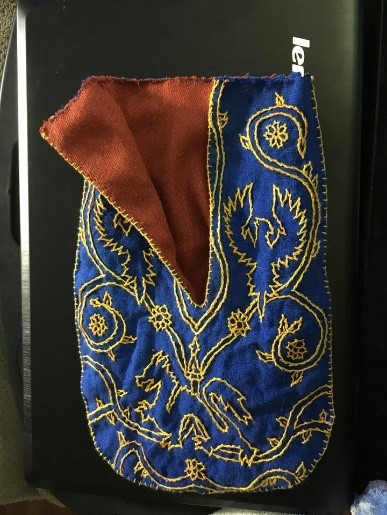
-If you want to add any decorations (beading, embroidery) to the outer layers it is best to do it now. Make sure to avoid the slit you marked, but it will be far easier to decorate first and then sew.
-Cut the slit.
-Sew the lining pieces together, and the outer fabric pieces together—wrong sides facing out (i.e. inside out). Leave roughly 0.25 to 0.5 inch seam allowance.
-Turn the outer fabric right-side out but keep the lining inside out. Stuff the lining inside the pocket made by the outer fabric. Fold the edges of both pieces of fabric at the slit inside by 0.25 to 0.5 inches and sew together.
-After you’ve sewn the slit shut you can add decorative edging such as a blanket stitch.
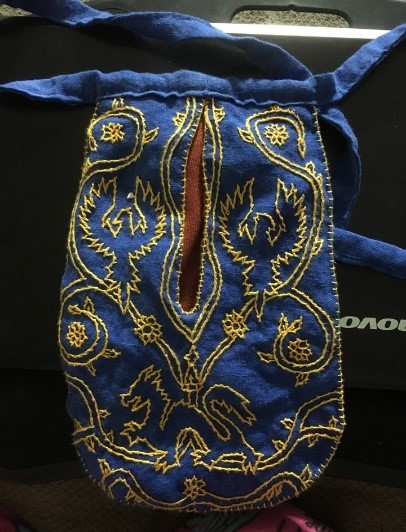
-The next step is to create the waistband. In order to create the waistband first measure the waist of the individual that will be wearing the pouch. Add approximately 12 inches in order to leave enough room to tie the waistband.
-Cut out a strip of fabric to the length above, and 1.0 to 1.5 inch wide so that when it is folded over it is roughly 0.5 inches wide. Fold it so that no raw edges show, while also folding it over the top of the pouch to secure it. The pouch should be clamped in the middle of the waistband. Make sure to keep the edges of the slit as close to touching as possible when securing the waistband to it.
-Sew the waistband closed, securing the pouch in the process. Tie it around your waist, positioning the pouch in a spot that’s easily accessible, and enjoy the benefits of having a portable pocket.
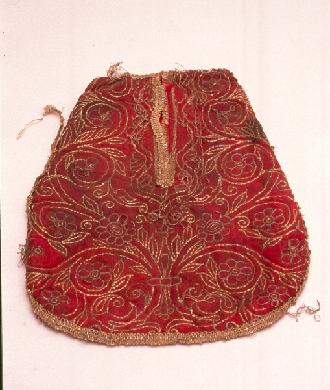
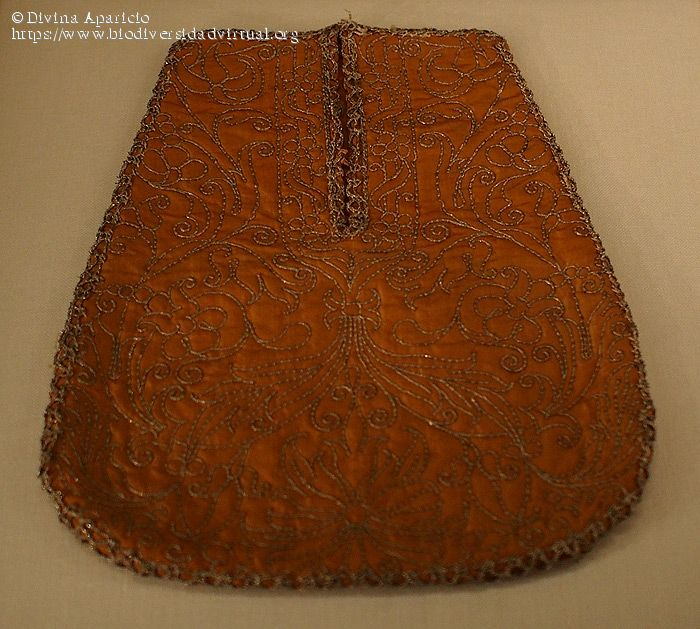
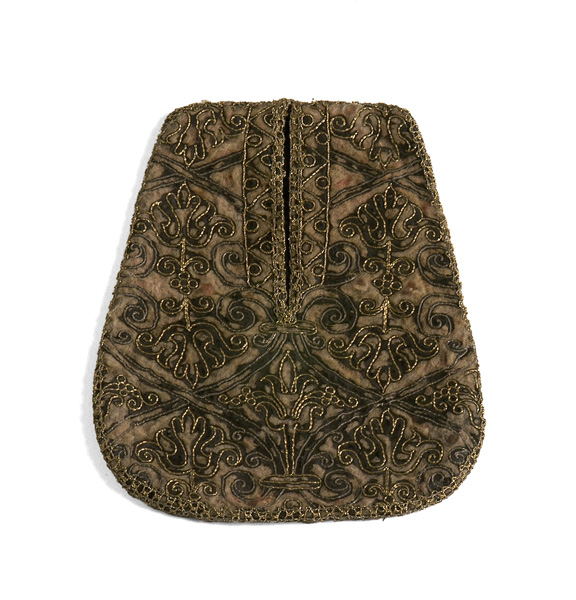
Below are extant examples of saccocia/faltriquera. They all date from the late 16th to the early 17th century and can be found at the Museo del Traje in Madrid, Spain.
Sources
Anéa. “A Renaissance Saccoccia.” A Renaissance Saccoccia. N.p., n.d. Web. 02 Nov. 2013. (http://aneafiles.webs.com/saccoccia.html)
http://adventuresofawannabeseamstress.blogspot.com/2011/06/saccoccia.html?m=1
http://ceres.mcu.es/pages/Viewer?accion=4&AMuseo=MT&Museo=MT&Ninv=CE000792
http://ceres.mcu.es/pages/Viewer?accion=4&AMuseo=MT&Museo=MT&Ninv=CE001151
http://realmofvenus.renaissanceitaly.net/challenges/IRCC2012/IRCC-II-2012-KellyP.htm
http://realmofvenus.renaissanceitaly.net/challenges/IRCMC-Sep-Oct2012/CarolL-WomanToilet.jpg
Da Brescia,
Katerina. “Kat’s Florence Files – Saccoccia – Pocket/Pouch.” Kat’s
Florence Files – Saccoccia – Pocket/Pouch. N.p., n.d. Web. 02 Nov. 2013. (http://purplefiles.net/katerina/garb/diaries/FLSaccocciaPouch.html).
[1] http://purplefiles.net/katerina/garb/diaries/FLSaccocciaPouch.html
[2] From http://adventuresofawannabeseamstress.blogspot.com/2011/06/saccoccia.html?m=1